Difference between revisions of "User Interfaces"
| (2 intermediate revisions by the same user not shown) | |||
| Line 33: | Line 33: | ||
==== Static section : Contact Details, Shipping Details, Card Details ==== | ==== Static section : Contact Details, Shipping Details, Card Details ==== | ||
These are some static form segments to get user information <gallery perrow="3" caption="Figure 1.8 Static Form Segments"> | These are some static form segments to get user information <gallery perrow="3" caption="Figure 1.8 Static Form Segments"> | ||
File:User contact info1.png|User Contact Info | |||
File:Shipping section .png|User Shipping Info | |||
File:Card Details Section.png|User Card Info | |||
</gallery> | </gallery> | ||
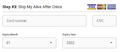
==== Order bumps ==== | ==== Order bumps ==== | ||
The dynamic order bump section is editable from the back-end. | The dynamic order bump section is editable from the back-end. | ||
[[File:Order bump section.png|alt=Order bump section in the checkout page|none|thumb|Figure | [[File:Order bump section.png|alt=Order bump section in the checkout page|none|thumb|Figure 1.9 : Order bump]] | ||
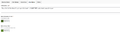
Modification area built using custom fields plugin can be access by following ''wp-admin > pages > Checkout page.'' | Modification area built using custom fields plugin can be access by following ''wp-admin > pages > Checkout page.'' | ||
[[File:Checkout order bump back-end.png|alt=Order bump edit area|none|thumb|Figure 2. | [[File:Checkout order bump back-end.png|alt=Order bump edit area|none|thumb|Figure 2.0 : Order bump edit]] | ||
==== Order Details area ==== | ==== Order Details area ==== | ||
As a final step, you will see the detailed summary of the order as well as the grantee option with the checkout button | As a final step, you will see the detailed summary of the order as well as the grantee option with the checkout button. | ||
[[File:Order summery Section.png|alt=Order detailed summary|none|thumb|Figure 2.1 : Order Summary]] | |||
In the user interface, the user is given the option to add grantees to a product that the client can choose from, and change the checkout button style and text in this area from the back-end.<gallery perrow="2" caption="2.2 Order Detail segment"> | |||
[[File: | File:Garantee section edit.png|Guarantee Edit Area | ||
File:Checkout button edit.png|Checkout Button Edit Area | |||
</gallery> | |||
== Up-sell Page == | |||
[[File:Upsell page example.png|alt=Upsell Page Example|thumb|Figure 2.3 : Upsell/Downsell Page]] | |||
For Additional product promotions, user can create multiple pages for each .product. This can be a typical WP page optionally build with any build tool like WP bakery or Elementor. Just like explained in the Landing page section user must assign a product id and variation id to the page. In addition to these post meta user must utilise the below shortcode in the page. these short code will add necessary variable to the page required in the funnel. | |||
[next_step] | |||
User can setup multiple upsell/downsell pages one after another using the '''funnel steps''' area in the '''funnel setting''' dashboard. These pages the visitor have capability of ignore the product suggestions or accept and add it to the cart and actions will execute accordingly. see [https://funnel-settings.seneview.com/index.php?title=Process_Flow#Step_07:_Upsell_Pages Upsell process]. | |||
== Order Confirmation Page == | |||
[[File:Order confirmation page.png|alt=Order Detail Page|thumb|Figure 2.4 : Order Confirmation Page]] | |||
This will be the final page of the Funnel Process See [https://funnel-settings.seneview.com/index.php?title=File:Funnel_Settings_Version_2.1.x.png Process Flow Diagram]. summary of the user's order will appear on this page along with some tracking information. These Order details are dynamically generated by the shortcode on the page | |||
[order_confirmation] | |||
'''Note:''' In order to this to be last step admin must use this as a final step in the funnel steps in the dashboard | |||
== See Also == | |||
[[Funnel Settings]] | |||
[[Admin interface]] | |||
[[Process Flow]] | |||
Latest revision as of 11:45, 8 May 2022
Landing Page[edit | edit source]

The landing page is the first page of the site where the user interacts with. To be able to do this, you first have to set up the front page of the WordPress site. See how to change the WordPress front page. Choosing which tool to use for building the page is up to the user. for example Elementor, WP Bakery, etc. It is a necessity to add the variation ID and relevant product id you are promoting on the page to the front page meta description. see figure 1.2: Landing Page meta. Generally, this need to be applied to any product promo page created on the site.

Opt-in Form[edit | edit source]

It is necessary to use an opt-in form in order to collect email addresses from users. This can be a page, part of a page or maybe a popup integrated with the opt-in-form shortcode. This will integrate a small form to collect the email of the user and some additional details required to register the user to Earnware.
To integrate the form shown in figure 1.4, the following shortcode must be used. It is possible to override the form style by changing the theme style.
[opt_in_form]
Additionally, users are allowed to change the default redirection path of the user registration process by adding the following attribute to the shortcode. Default will be the checkout page of the product
[opt_in_form redirect_to="redirection path"]
and also the page type which is checked during each page submission by the funnel plugin. Default will be the checkout page. There are several predefined page type to use. see Enums
[opt_in_form page_type="page type"]
The attribute doesn't change the form's look, but it adds some hidden variables that will be needed for the next step.

Checkout Page[edit | edit source]

Checkout page also can be a typical WP page integrated with the checkout form short code with different look and feels.Main checkout page can be divide into several sections. These section defer to the style use within the shortcode.
[checkout_page] , [checkout_form_v2] , [checkout_form_canada_v2]
Item Options[edit | edit source]
The pricing schemes for the Main Item are presented to the user in a variety of ways.

The user has the option of defining these options in the back-end of system checkout page. Can be access by WP-admin > pages > checkout page you defined

Static section : Contact Details, Shipping Details, Card Details[edit | edit source]
These are some static form segments to get user information
- Figure 1.8 Static Form Segments
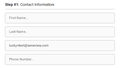
User Contact Info
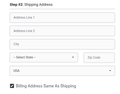
User Shipping Info
User Card Info


Order bumps[edit | edit source]
The dynamic order bump section is editable from the back-end.

Modification area built using custom fields plugin can be access by following wp-admin > pages > Checkout page.

Order Details area[edit | edit source]
As a final step, you will see the detailed summary of the order as well as the grantee option with the checkout button.

In the user interface, the user is given the option to add grantees to a product that the client can choose from, and change the checkout button style and text in this area from the back-end.
- 2.2 Order Detail segment

Guarantee Edit Area
Checkout Button Edit Area
Up-sell Page[edit | edit source]

For Additional product promotions, user can create multiple pages for each .product. This can be a typical WP page optionally build with any build tool like WP bakery or Elementor. Just like explained in the Landing page section user must assign a product id and variation id to the page. In addition to these post meta user must utilise the below shortcode in the page. these short code will add necessary variable to the page required in the funnel.
[next_step]
User can setup multiple upsell/downsell pages one after another using the funnel steps area in the funnel setting dashboard. These pages the visitor have capability of ignore the product suggestions or accept and add it to the cart and actions will execute accordingly. see Upsell process.
Order Confirmation Page[edit | edit source]

This will be the final page of the Funnel Process See Process Flow Diagram. summary of the user's order will appear on this page along with some tracking information. These Order details are dynamically generated by the shortcode on the page
[order_confirmation]
Note: In order to this to be last step admin must use this as a final step in the funnel steps in the dashboard